By chance found the text for a complete article I wrote long time ago on my Panzerkampfwagen 35(t), so thought it could be shared online now even if the pics had been posted here previously. Maybe can inspire somebody to build this old 1/35th CMK kit or the superb new one from Bronco...

"I was trying to put some order in my workshop when I found the CMK kit, purchased just as soon as it appeared many years ago and stored under piles of other models. Thought it was time to make some justice to it, I had nothing in my collection from the french campaign of 1940 and wanted to make some early war models so the 35(t) would be perfect. That campaign was short, but far more intense and brute than people generally knows. I wanted to portray one of these dusty grey machines, rolling across the northern french fields in the early summer of 1940.
The Pz.Kpfw. 35(t) has a very special flavour. Posed against other popular, newer and better-known panzers, it seems a dinosaur: full of rivets, strange shapes and a running gear born in an engineer's nightmare. But for its time it was a good tank, a really good tank. In the 30s, Czechoslovakia was one of the main weapons sellers in Europe, and its products, specially the ones coming from big concerns like Skoda or Praga, were very advanced, finely engineered, and famous for their quality and reliability. When Skoda unveiled their L.T. 34 and got the first contracts from the czech army, many european countries (Bulgaria, Romania, Poland, etc) showed interest in buying the type or getting production licences (even the United Kingdom was interested in its tecnology). Some of these countries finally got a handful of them, but due to the annexation of Czechoslovakia by Germany and the WW2, export orders were frozen. Today the Leopard 2 has become the "eurotank", but in its time the Pz.Kpfw. 35(t) was a candidate for that title.
The CMK kit is a classic kit, that is, just plastic and decals, and the only available in the market. Well, in fact we also have the Tamiya edition, which is nothing more than the CMK kit reboxed with some additions. And wellcome addtions, I must say, as Tamiya provides new updated MGs, some early jerrycans, extra boxes and details that really enhance a lot the final look. Whatever you find the original CMK issue or the Tamiya reboxed one, give it a try. (Ed. Note: We now have the new and nice Bronco kit in two versions!)
BUILDING
Ok, let's look onto that beautiful beast. Surprisingly, the kit has some delicate and very nice detail in places, a good fit overall and no flash (mine was surely from the first batches, so things could be different afterwards). But plastic moulding has its limitations and dozens of rivets are nearly non-existant, specially in the sides of hull and turret, so they have to be remade/replaced. I had a good stock of old Tamiya Lee/Grant hulls, perfect as donors for the rivets, so I just needed a couple of quiet evenings to put them right. It's easy, don't be scared. I sanded away the offending rivets in the kit, just leaving a hint of their position. With a new, sharp blade, I shaved-off the rivets from the Tamiya kits just as I needed them, around 10 at a time, this way the rivets than can be lost are fewer: sometimes I have collected dozens of rivets in a small box only to get all of them blown away by chance! My process was leaving 3-4 tiny drops of Tamiya Extra Thin Cement (the one with green tap, which I use for everything) in the position of as many rivets, and then picking and placing these with the tip of the cutter. With a dozen or so rivets in place, and the glue still soft, you can place a small metal ruler against them and straighten any rivet out of the line. Once you are happy, another slight touch with the Tamiya cement will fix them definitely.
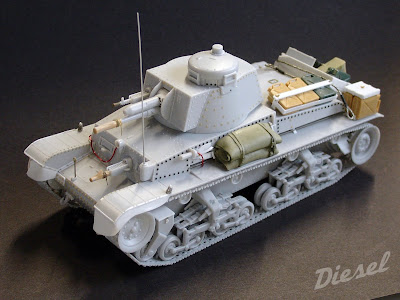
On the turret we have also to replace the rivets along the sides, but don't forget that the seven lower ones just over the turret ring are slotted like screws. The cuppola lacks also some rivets between the vision blocks.
At the hull front I replaced the mountings for the towing hooks and the two small rivetted plates over them. The front mudguards need some extra detail. A very thin plastic strip runs their front and outer sides, to which some tiny rivets were added. These were made cutting slices from thin stretched sprue. The same method was used for the rivets on the mudguards innner sides. An L-angle section complete with bolts must go over the joint between the mudguads and the glacis. The 35(t) has some very peculiar looking rubber flaps at the front, and for replicating these, I glued thin plastic sheet roughly cut to shape, and once cured it was cut and sanded until getting the correct profile. The left one was torn away like it usuallly happened to the real thing.

I had to fill in some sink marks in the antenna mount and also the first groove of the pair you'll see in both front mudguards. The horn was hollowed out and wiring added. Two position lights or traficators that go over the mudguards have to be made. These were ingeniously spring-mounted, so as not to get them ripped off when rubbed against tree branches or the like. To make the coil I wounded some thin brass wire around a piece of sprue, but that was too soft, so I finally made them in steel wire. For the bulb, I simply pinned a small rounded section of plastic rod.
The headlight looks better if hollowed out, a transparent lense inserted, and some wiring included. At the time I was out of stock of lenses, so I made my own. It's simple and fast, just five minutes. Take a piece of transparent sprue more or less of the same diameter as the headlight. Roughly file to a round shape one of the extremes. Get some mid-coarse sandpaper and work for a better shape. Follow with finer types till you get a nice uniform finish. Now, take the sprue and rub it against a cotton cloth, in circles and from side to side. Rub for some seconds at a time, and a nice shine will start to show. Once you are satisfied with the finish, get a very fine saw (I use a razor-blade type from the czech tool supplier CTC) and very carefully slice the back of the lens from the sprue. Now with your finger against the rounded front, sand the back over a flat surface and polish against the cotton cloth: here you have a perfect, home-cooked lense for your model. A good idea is to get some sprues in red, orange and yellow from car models, these will come very handy in lots of projects.

A thin rod, used to tie stowage, rucksacs, etc, has to be added along the full length of the opening in both sides of the hull. Mine was made of streched sprue, but any metal rod will work. I made a new shovel and replaced the jack with a resin one from M4 Models and some bits. Supports and leather straps were made for these and the other tools in the sides, and a couple of resin blankets from Resicast were packed over the mudguards. Two different jerrycan supports were improvised in time for the french campaign. One was fitted over the engine, just a wooden plank over two rods, trapping three cans, with sometimes a support bar running under the can bases (details differ in many vehicles). Another one was a simple vertical rod that trapped the jack wooden block and the two cans under it, with a couple of L sections on the mudguard to prevent the cans sliding off. I used mixed early and mid type jerrycans from Tasca and Tamiya.
The engine covers lacks the hinges, so these and a new handle were made with plastic sprue. The exhaust needs some details like drilling it open and making the plate and bolts that secure it to the engine side. A rear Notek light and a position/stop commercial type light have to be fitted at the back. The rear mudguards need a small vertical section on their inner sides, and the spare track links would benefit from making some casting texture and securing plates and bolts.

The main gun and the two MGs show poor detail, specially the gun muzzle. Lionmarc has a lovely set complete with main gun and both MGs for the 35(t), but when announced I had just glued the kit parts and would be quite difficult to go back. Instead, I decided to put a canvas cover over the gun and the hull MG, first removing the front portion in both of them. Then a piece of sprue was cut to shape, a generous layer of Tamiya cement applied and the wrinkles modelled with a brush while still wet. Cords were made from stretched sprue. The last details were drilling the MG sights and glueing some bolts and bits.
A wooden box for extra stowage was sometimes improvised over the rear of the engine compartment. For this one, plastic sheet was textured with coarse sandpaper, some planks cut from that and the box built up with these. Fine strips were used for the L sections that hold it to the hull, and some boxes and jerrycans went inside.
PAINTING
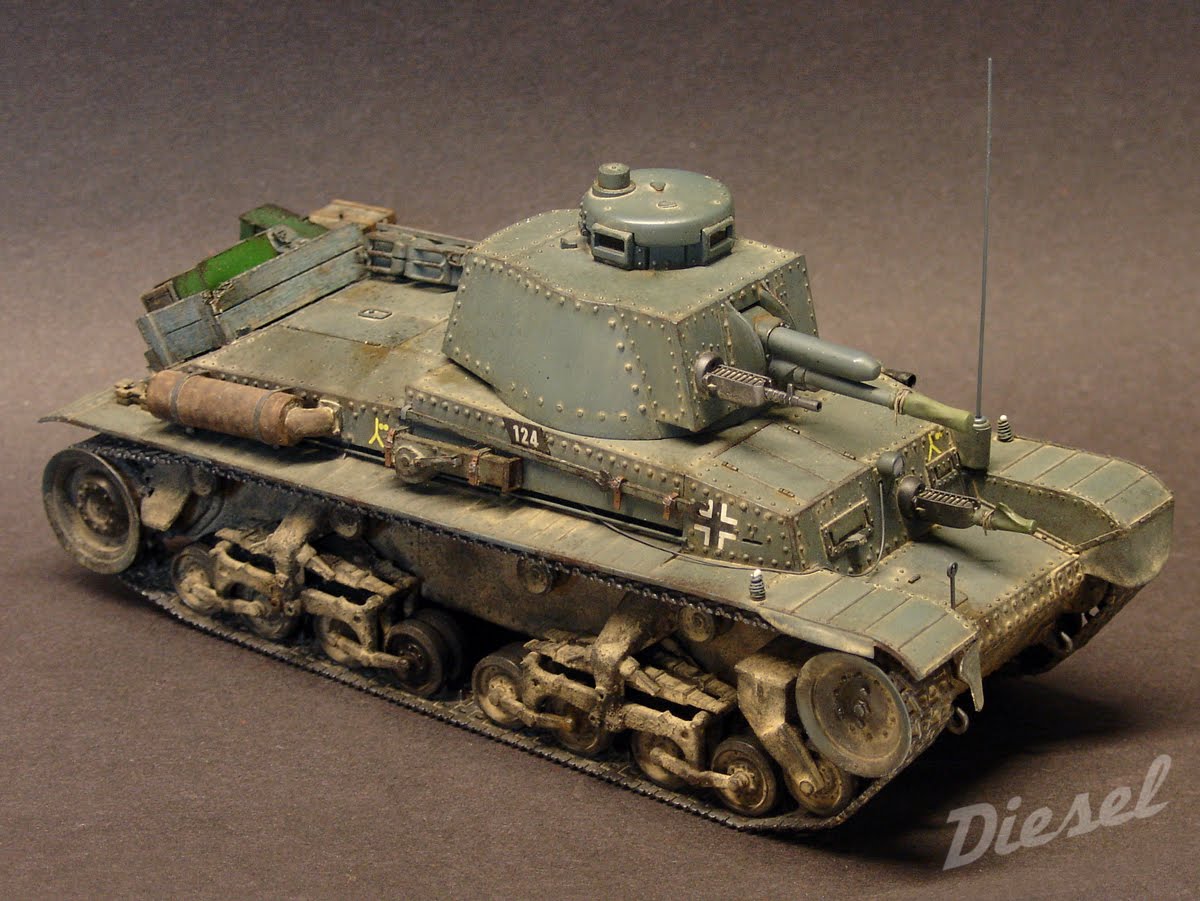
From the first moment I knew clearly that my Pz.Kpfw. 35(t) would be a 6th Panzer Division vehicle. And I wanted to portray how the grey colour fades, changes or even chips from one area to another, how the dust and dirt, dry and wet mud, a greasy hand from a crewman, the rubbing of boots or uniforms, the fuel spills... how all these factors contribute to make an attractive look. The tip is to get and mix very subtle and natural effects, nothing overdone. Maybe during the process we feel that we are making few scratches, few washes, few dirt. But the summing-up of all those small effects, well placed here and there, is what makes the final, real and natural finish.

I think we have to enjoy painting, and at the same time we have to know very clearly which final effects we are looking for, not to paint just for the sake of painting, following a "recipe book", or painting with haste or no illusion. A model requests from us utmost care, and every airbrush layer and every touch of the brush are there for something, with a clear objective. Each model is always unique, it presents different challenges and finishes in which a technique or process can serve, and others won't. In that aspect, it was very fun to paint this 35(t).
Before painting I washed the model with lukewarm water, dish-cleaner and a smooth brush, and let it dry well. Mud texture was made at this point with Tamiya putty and an old brush. I use Tamiya paint for the colour base or those applied by airbrush, and allways use its own thinner, not common alcohol or the isopropilic one. The Tamiya thinner has a "greasy" agent in its formula that increases the fluidity in the airbrush, and in addition guarantees that paint will not dry in the quick travel between nozzle and model surface, as it usually happens with the alcohol, which leaves a rough, dusty finish, and also affects the own adhesion of the paint.

My painting method is quite chaotic, I do not have fixed receipts and like to test and try colour mixes and techniques on each new model. I make basecoats and camouflage mixes in a Tamiya jar by eyeball, and directly in the airbrush cup for the filters, etc. I know I'm not an example to follow, but this is the way I work. For the basic colour I usually don't adhere to available ones. The diverse manufacturers, atmospheric agents, application methods, etc, always affect the official colour and that allows us to obtain still more variety in every model. For the grey colour base I made my own mix by "Eyeball MkI", but say around 40% of Dark Grey, 50% Light Grey and 10% Dark Blue. I must say I was looking for that nice blueish grey that can be seen in period photos, but maybe I went a bit too blue?
I then began adding some shadows to the vehicle, first by airbrush with a mix of black and sienna Holbein inks highly diluted in Tamiya thinner, and thereafter pin washes of a very dark brown, almost black, Tamiya enamel mix with Mig Productions thinner, specially on panel lines, around rivets, bolts, etc. For washes of this type it's good to previously damp the surface with thinner, in this way paint will flow better and without leaving edges as it dries.
Time for filters. I employed them in two ways. One was airbrushing highly diluted gray, blue, and orange Tamiya acrylics, working in general areas. The other was Humbrol and Tamiya enamels highly diluted in Mig Productions thinners, applied by brush and working in small areas to get still greater tonal richness from the base colour. This is great too to get some variety in tone and volumes between different panels.
Chipping was next. I used Vallejo rust, in some areas mixed with a bit of black for darker chips. Try allways to make the chips as small as possible, better a dozen small chips than a big one. Put logic in them, too: don't overdone or make chips everywhere, select areas that really suffer a lot, and play with the amount and shapes of them. Afterwards, it's good to apply over these chipped areas some small filters made up from Tamiya or Humbrol enamel mixes (red brown, dark brownÖ) diluted in Mig solvent, to blend better the effect into the general finish of the model. These filters work quite well too for very rusted areas, superposing thin layers of several tones (brown, orange, yellow, etc.) and varying the proportions according for old and dark oxides, or new and brighter ones.
The MGs were first coated in black, then some graphite dust (from a sanded pencil) was simply rubbed over with the finger. Jerrycans, boxes, tools, etc, were painted like the vehicle.

Let's go now for some mud, dust and dirt. First I gave a dark brown wash just over the lower hull, suspension, etc. Then started with washes of Tamiya buff and sand colours, very diluted in water: in this way the paint pigment precipitates when drying and leaves a very natural accumulated dust effect. We have to watch out this drying process, because we have the small risk of leaving an edge, but with a water-dampened brush we will be able to touch up those edges as they start to show and make them disappear without problems. We can make that treatment stronger in the lower hull, and making "micro-washes" over the upper hull and turret we can play with the two colours, one beside the other, or one over the other, in a very effective way. If we like, we can rub with the a small cotton cloth or the finger over selected areas, to get some shine from the surface, making a nice contrast with the dusty surround, like in the turret cuppola or mudguards.
Grease and petrol stains also add interest. Mixing Humbrol gloss varnish, black and earth paint and some drops of turpentine spirit, and playing with the proportions of these ingredients, we get can easily different tone, humidity and texture degrees. Those mixes are then carefully splashed here and there, with the aid of a hard brush "rattled" against the handle of another one.
Markings are transfers, the crosses came from Archer and the divisional sign from Verlinden. The tac number rhomboid was designed in the Mac, printed, cut and glued. A soft, dirty acrylic wash over them was enough to weather them. Final touch was the antenna made from sprue, painting the white plastic position lights/trafficators, and rear lights.
Just hope what I have written helps you a bit with ideas, and inspire you to give an opportunity to those not so new models that quietly sleep in every model shop!"


 Oh men, we held KitMeet 1.5 some days back at Palafrugell (Girona-Spain). What a fantastic modelling weekend! That was the 5th edition of a new concept of meeting for modellers: a three-day long workshop perfect to enjoy our hobby. A big bunch of modellers working, talking, sharing knowledge, making friends. Pure modelling essence. And enjoying at the same time the beautiful coast, the delicious food and many other things that make the KitMeet a perfect event to attend.


